Monday, September 26, 2011
Friday, September 23, 2011
How to Make a Leather Chisel Wrap
One of the first projects I tackled with my new sewing machine was to make my Fiance a chisel wrap to house his hand tools. If you are interested in doing this yourself, follow along.
The tools you will need:
- cutting pad
- rotary cutter
- ruler of some sort
- a marking device (soap, chalk or a pencil)
- a good iron
- heavy duty thread
- leather (I used deer skin)
- denim
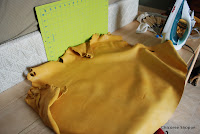
Supplies
Iron out any wrinkles in the leather and stretch as much as possible when the skin is warm to touch. Use a ruler and rotary cutter to square the piece of leather you are going to use for the wrap. I decided to leave the flap side raw as it adds a rustic appearance. Fold the bottom end of the leather to the desired height you wish to have it. This will serve as the pocket for the chisels to sit in. Cut a piece of denim to fit inside the pocket as a liner. The leather is quite soft and without a liner, the sharp chisels could puncture through. If you have a serger, serge the edges of the denim; if not, simply sew along the edges with a zigzag stitch to reduce fraying.
Fasten the denim to the leather along the bottom edge of the wrap. Fasten the denim at the top edge. Create a two step hem on the top edge of the denim by folding the raw end inwards, iron flat and then again, iron flat. Sew this to the leather for a clean, accentuated pocket.
Place the chisels inside the unfinished pocket to ensure the height is where you want it. Now turn the pocket inside out and fasten the pocket sides. I reinforced the first stitch to increase the strength of the seam.
Fold pocket outwards. Start sewing slots into the wrap by measuring first with the chisels. I created a specific pocket for each chisel but universal sized ones could also be created. Use a marking utensil to get the desired width for the slots and a ruler to ensure they are square with the wrap itself. I sewed two stitches side by size for added strength and decorative purposes.
I left a larger pocket in the middle of the wrap so that extra slots could be added in the future when the chisel collection increases. To complete, sew a strap to one edge of the wrap. Ensure that it is centered on the wrap when it is all bundled up before you fasten it.
All finished!
All wrapped up!
The bottom edge
Side profile
The happy boy sleeping with his new chisel wrap!
Thursday, September 22, 2011
The Swagger - 2011 winter fashion
This fall I am pleased to see that some great oversized trends are on the Runway. I have an over sized chest filled with just such coats that I will start listing on Etsy!
 |
| Wish I had this coat! |
 |
| I Have this exact coat. Purchased in mint condition from a garage sale for 1 dollar! |
 |
| Where in the World is Carmen San Diego? |
Subscribe to:
Comments (Atom)


